Feeder insects are an essential food source for many animals kept in zoos. There is a huge variety in different feeder insects: crickets, cockroaches, waxworms, mealworms, superworms, and so on. Among them, locusts are a fantastic feeder insect to use. They are the largest live insect food source in captivity and providing much more nutrition compared to other live food such as crickets or mealworms. However, if you have bought locusts at commercial animal food stores before, you will know that they are quite expensive to buy regularly. When breeding locusts successfully can save you a considerable amount of money each year. Within this practical guide, we will look at an easy method that shows how to set up a locust breeding station and to take care of them, so it provides enough locusts to feed many animals in your zoo. This guide will focus on breeding locusts for feeding insects, although many information can be used for keeping and caring for locusts. Are you ready to learn how to breed locusts with this easy how-to guide? Let’s dive in.
Locusts breeding versus buying
Of course, you can easily buy (often good quality) locusts at many animal food stores. In contrast to many other live insect locusts are quite expensive. One reason for this is that they are higher needs in terms of housing, environment, diet, and time. But don’t let it scare you off. Breeding locusts have many benefits that not come with buying them. One of the first significant benefits is that you know precisely how well-fed and therefore, how nutritious every locust is as a food source. As you can read further below, this method will ensure that they are well-nourished from day one. Another major benefit is that you have the flexibility to use every size locusts as your animal need. This flexibility is far more challenging to take into account when buying them. One bonus reason to breed them is that the excess not needed as a primary food source can be used as enrichment food/treats (or supplementary feed) for many other animals. For many animals, locusts can serve as valuable enrichment variation onto there normal diet, with an additional behavioural benefit that they need to hunt and catch them. I think reason enough to start breeding them, right?
Locust allergy risk
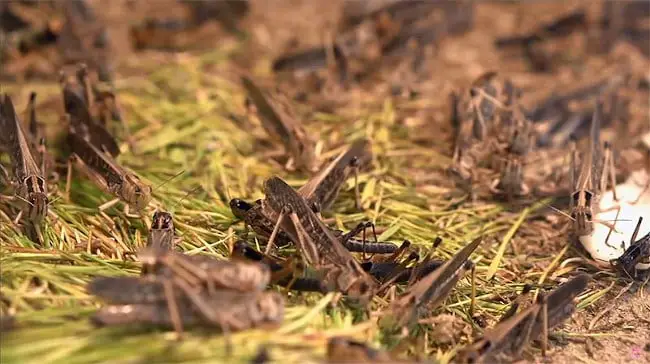
Locusts make a perfect feeder insect and are easy to breed. However, occupational allergic reactions to locusts or faeces have been recorded among zookeepers. When keeping large breeding colonies and taking care of them on a day-to-day basis can result in allergic reactions. It may not result in a reaction first, but over time you can develop minor or even severe reactions. Keepers that have asthma may be affected more than others. When you take care of them regularly, it would be good practice to use disposable latex gloves and disposable face masks. Pay attention to any irritations of the skin, eyes, or coughing and sneezing in response to caring for locusts.
Species of locusts
First of all, let’s distinguish the difference between grasshoppers and locusts. Actually, locusts are species of the grasshopper family. While grasshoppers, as the name says, hop and can be in abundance, locusts can fly and have wings. But why then do we talk about locusts? Well, the two main species used for breeding as a food source are both locusts: the migratory locust (Locusta migratoria) and the desert locust (Schistocerca gregaria).
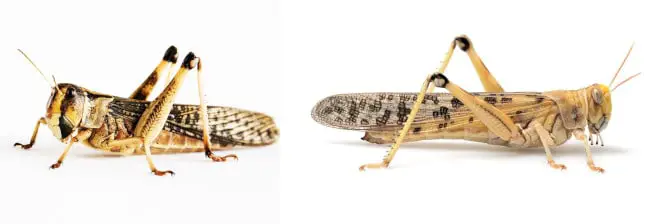
Both species belong to the short-horned grasshopper, and both are well-known as swarming locusts, destroying complete crop fields. These type of locusts are used because of their amount of eggs they lay, the ease to breed with them and the nutritional composition. Many others, and especially the more colourful locusts and grasshoppers, have a certain level of toxicity and should not be fed. Of course, you can use this method to breed other species of locusts and grasshoppers; however, you have to adjust the environment (temperature, humidity, habitat, etc.) to that it fits with your certain species.
How-to housing and create a suitable environment for locusts
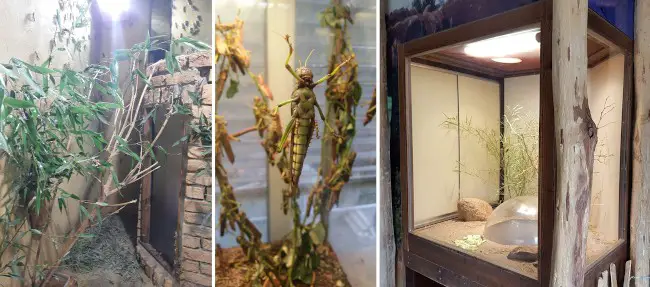
There are several ways to house species of locusts and grasshoppers. Some zoos have locusts on display to show to the visitors. In most cases, locusts are housed in terrariums or adapted glass aquariums. Here we will look at housing locusts for a breeding colony.
Enclosure type and size
The easiest way is to use a glass container, a glass terrarium, plastic terrarium or a fauna box. Glass is easy to clean, is better suited for high temperatures and gives good visibility. Plastic surfaces get scratches quicker and can crack when dried out in high temperatures. On the other hand, plastic is cheaper and more lightweight to move so that it can be more practical in that way. I prefer a glass enclosure, but that is my personal preference. Locusts can chew through fabric gauze, so never use this material to build-up your enclosure.
The enclosure needs plenty of ventilation with the use of very fine mesh and needs to be able to appropriately closed to prevent escapes. Ventilation is crucial because locusts need very low humidity (see also environmental parameters), but also avoid overheating.
The enclosure needs to be big enough; however, the enclosure size required depends on the number of locusts you want to house. As a guide, you can use a size of 50x50x30cm (75 litres) for every 20 adult locusts. We use enclosures of 50x50x80cm (200 litres) for 50 adults (breeding enclosures, more info at breeding management system). If you have space, however, bigger enclosures are preferable. But keep in mind that it takes more time to clean each enclosure and will decrease efficiency.
Enclosure furniture
When you focus on breeding, you don’t need any esthetic furniture in your enclosure. Animals do need to climb to heat up in higher parts and get down to eat or lay eggs. A climbing structure also increases the total surface of the enclosure. You can use some dry twigs or branches. However, we use metal mesh folded in a rectangular shape to fulfil this purpose. It is easier to clean, doesn’t tear down and doesn’t have to be replaced. Be aware that climbing structure is too close to the heating source so that the furniture and locusts are not burned. You can add some flooring with dry sand or coconut fibres. Our experience is that they don’t need that, and it can quickly raise the humidity. Besides, it is also more challenging to clean and keep a hygienic environment.
GOOD PRACTICE TIP: Make sure that climbing structure is not touching the heating source so that furniture and locusts are not get burned.
Environmental parameters – Temperature, humidity and light cycle
Locusts will keep well for several days at room temperature between 15 to 20 degrees celsius. However, the species we use to breed (migratory and desert locust) are desert species. It is essential to keep them much warmer. If you are keeping these locusts at room temperature, they will not digest food properly, and the food will decompose inside their stomachs, which result in illness and death. Keep locusts during the day at 30 – 38 degrees celsius. For the night, the temperature can drop to 20 degrees celsius. Never keep locusts lower than 15 degrees celsius. This way, they will thrive the best. Heating the enclosure can be done with a regular light bulb or regular heat bulb found in reptile-specialized stores. The right heat source should be found experimentally because every enclosure is different.
Because the locusts used are desert species, the humidity should be very low. A too humid environment will cause infections, illness and death. Do not spray water into the enclosure for this reason. It can also cause moult in the enclosure, which in turn is deathly to the animals. A dry atmosphere prevents locusts from getting fungal infection too. Of course, these locusts need moisture to survive but will get this from their food. Planty food sources can be sprayed lightly, but do this outside the enclosure before feeding it to the animals. However, close monitoring of the humidity is necessary. In any way, it is good practice to monitor temperature and humidity to see if the environment matches the needs of the animals. The environment where the enclosure is placed can affect the temperature (overheating) and humidity (get too wet). To measure is to know.
GOOD PRACTICE TIP: Planty food sources can be sprayed lightly to be fresh for a more extended period and give some additional water resource for the locusts, but do this spraying outside the enclosure so it will not get too humid inside.
For the day and night cycle, you can keep to a 12 hour:12 hour. Be aware that the animals mostly eat when during “day”, so keep in mind that they have enough time to eat. On the other hand, when cooled down during the night, the animals are less active. This comes in handy when cleaning the enclosure or when rearranging the number of animals in the enclosure. For that reason, we have set “day” from 11 AM – 11 PM, and night from 11 PM – 11 AM. This way it allows taking care of the animals before 11 AM and before they are warmed up and more active.
How-to feed and create a good diet for locusts
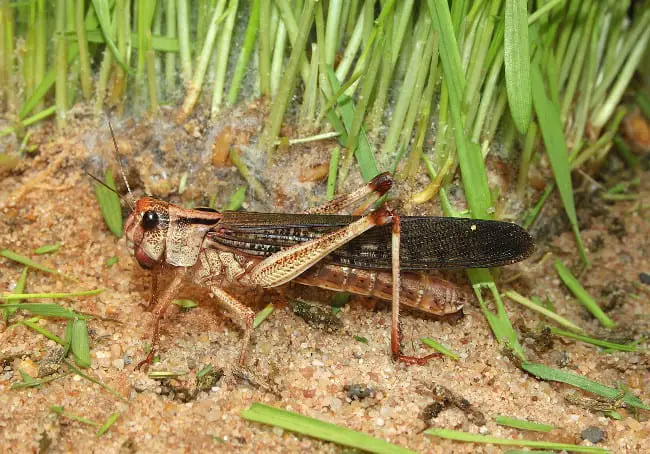
Both migratory locusts and desert locusts eat only plant material. Although they eat many plant species, some plant species are better eaten. The best and easiest food source you can feed is fresh grass. The best types are leafy reed, reedgrass and canary grass. Fine-leaved bamboo is also eaten very well. What you feed is also depending on the availability in your situation. At our zoo, there is little to no grass because our zoo is located in a wooded area. But we have plenty of bamboo growing that is eaten very well. You can also feed leafy vegetables, like endive or lettuce. But be aware that feeding plants are preferable. Some plants do better when put in water. Make sure that this water source is not accessible or easy to climb out for locusts to prevent drowning. You can use a mesh cover to stick through or use a sponge for this purpose. Another important factor to consider is that the food sources should be free of sprayed insecticides because this will result in certain death. Make sure that the animals are fed enough. When locusts are hungry, they stop breeding.
GOOD PRACTICE TIP: Some plants do better or need a water source. However, make sure that this water source is not accessible or easy to climb out for locusts to prevent drowning. You can use a mesh cover to stick through or use a sponge for this purpose.
Locusts will collect enough moisture from plant resources and don’t need an additional water resource. As a matter of fact, a (flat) bowl or bottle of water tend to result in drowning of animals and is strongly discouraged.
The nutritional value of the locusts as a feeder insect can and need to be improved by using gut loading. Gut loading is the process by which an animal’s prey is raised and fed nutritious foods with the intention of passing those nutrients to the animal for which the prey is intended. Gut loading can be done with several products. There are some special products available for this purpose, like for example Arcadia Earth PRO Insectfuel Insectfeed. These products are well balanced to increase the nutritional value of locusts as a feeder insect. Another product that works very well is ‘bird starter meal’. This product is full of proteins, and vital minerals and vitamins. The historical commonly used products based on bran is not recommended as a product for gut loading, because of its source of phytic acids and because of its full-spectrum is nutrient-poor. Also, phytic acids will limit the amount of calcium available and stored within the bones. Aquarium flakes are also often used. These flakes are a bad choice for gut loading as it is not designed as reptile food and can have unwelcome chemical additives (Arcadia Reptile, 2018).
How-to breed locusts and manage a breeding colony
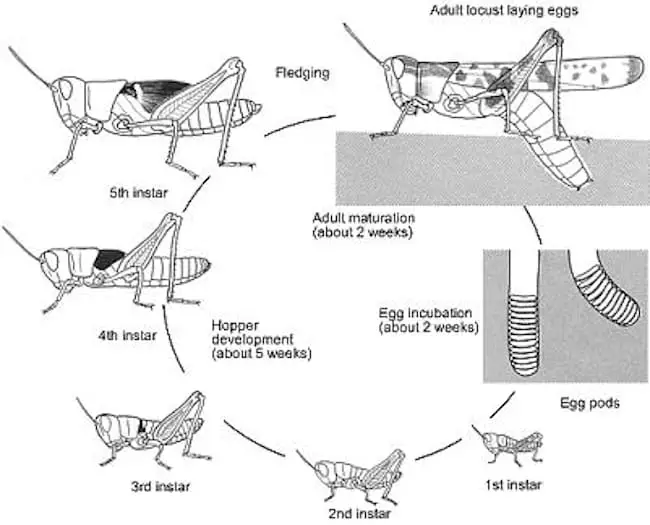
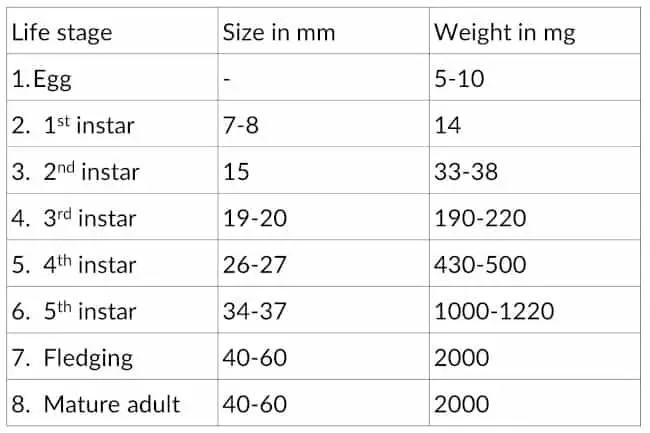
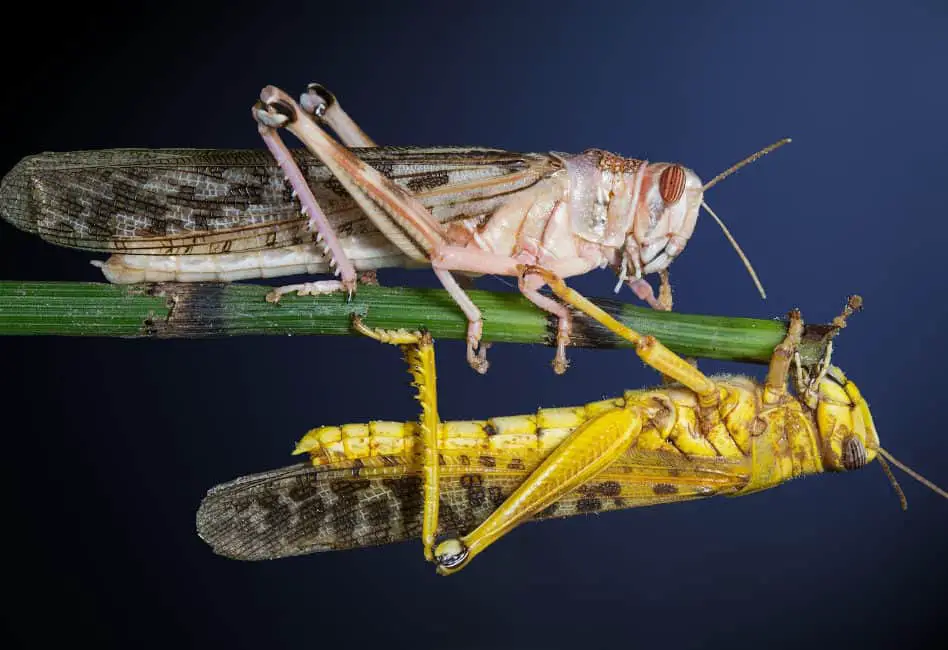
When you want to breed with locusts, it is good to understand its life cycle and development. We can distinguish eight stages in a locusts life cycle: egg – 1st instar hopper – 2nd instar hopper – 3rd instar hopper – 4th instar hopper – 5th instar hopper – fledging – adult mature. Eggs hatch after around 11 days. The development from egg to the fledging stage usually takes 4-8 weeks, dependent on environmental factors of which temperature is most important. Within a week the fledging will grow, strengthen their wing muscles and harden their exoskeleton. It will also develop eggs, and you can distinguish by then what are males (smaller yellowish) and what are females (larger grey brownish). The length of life of a locust is between 2,5 to 5 months. Some adults have been kept alive for a year.
The amount of adults in one enclosure depends on the size of it (as described under enclosure type and size). As sex-ratio, it is best to keep them 1:1 to 1:2. Because these locusts are meant as food, it would be best to select the biggest adults to breed. In this way, and when environmental factors and diet are right, you produce the largest locusts in the next generation.
GOOD PRACTICE TIP: To produce the largest locusts in the next generation, select the biggest adults for your breeding group(s).
Locusts will start breeding as long as you include some laying bins. Laying bins facilitates the best condition for your locust to inject their eggs in and makes it easy for you to collect and manage the colony. To set up a laying bin, all you need is a plastic container filled with substrate. The filling can be done with sand or dirt, but in our experience cocos-humus or cocos-ground works best. It is a more loose substrate and better holds moisture for the development of the eggs. For successful development of eggs, the eggs must absorb some water from the soil, especially in the early stages. The container should be at least 5cm heigh, preferable around 8cm heigh, and a surface of 10x10cm or when round 10cm radius. You can use candy bins (first to eat the candy, delicious!) or use plastic take out food containers. Also, the plastic containers that are used to transport live insect from reptile-specialized stores are perfect to use as laying bins.

GOOD PRACTICE TIP: I prefer filling the laying bins with cocos-humus or cocos-ground. It is a more loose substrate and better holds moisture for the development of the eggs.
There are several ways to set up and manage the hatching of the eggs. You can keep the adults and eggs in the same enclosure, and let them hatch there. That can work fine when you have them on display for visitors in enclosure large enough, but it makes it immensely difficult to manage it as feeder insects. However, the newly hatched nymphs are tiny, so you might want to keep them in a different enclosure. You can set it up by having the breeding adults in one enclosure, and let the eggs hatch in another enclosure. This way you only have to refresh the laying bins in the adult enclosure, without the problem to keep all the instar hoppers walk around and escape the enclosure. It will work, but if we want more efficiency and more managing result, I think I have a better solution.
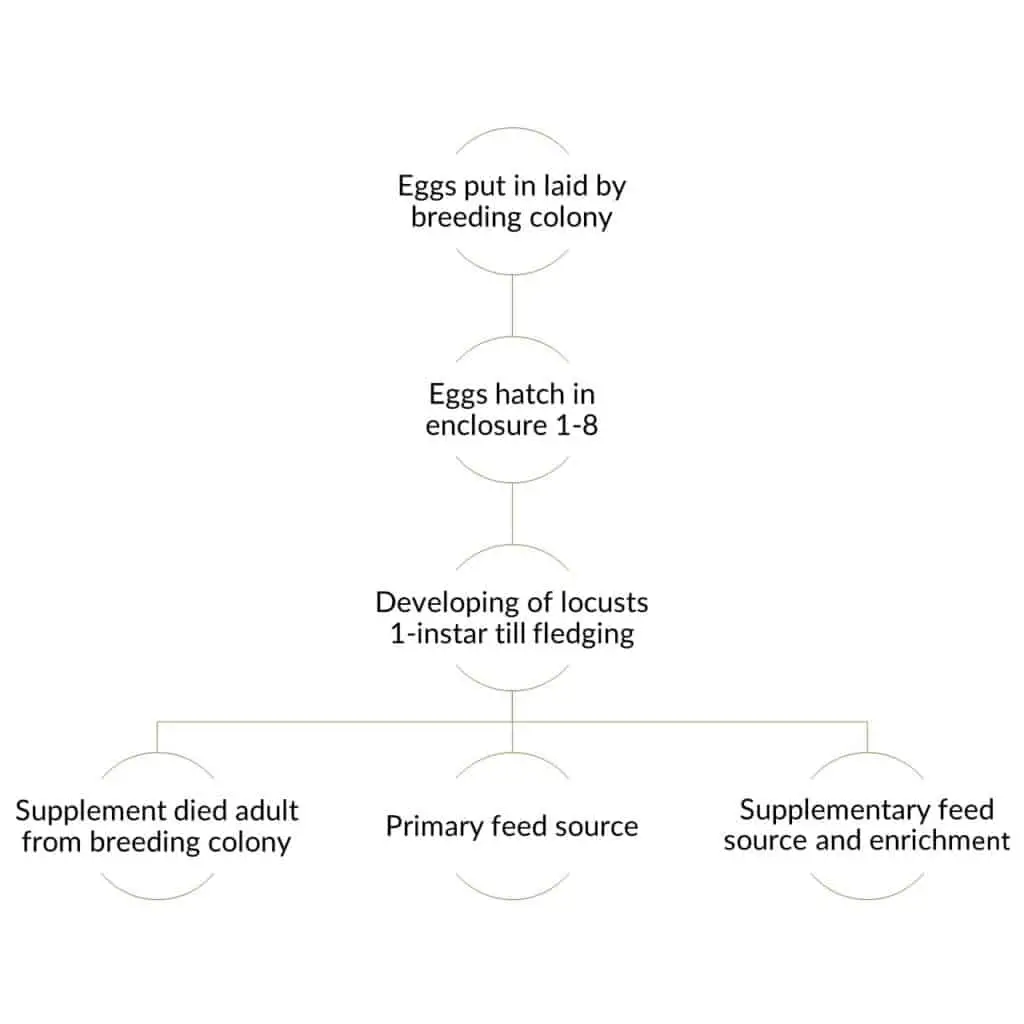
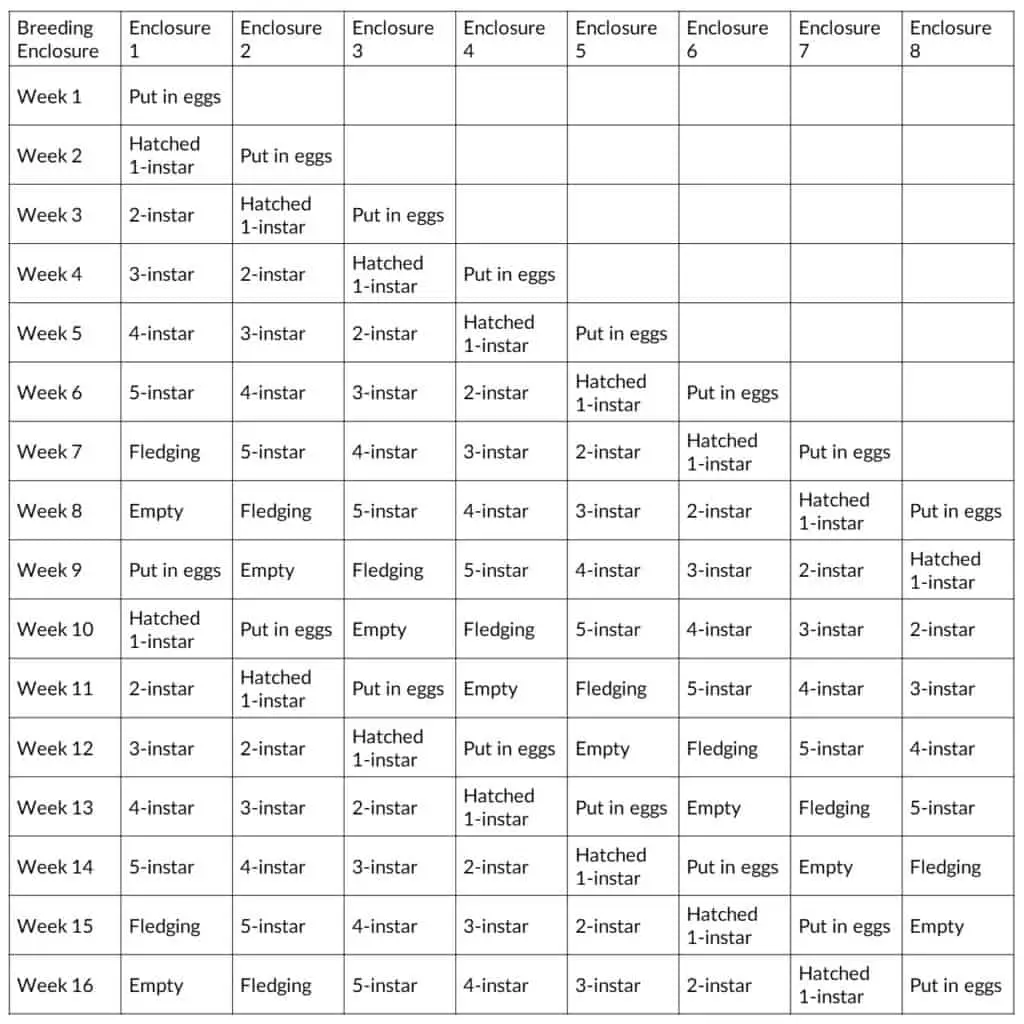
We use a rotational system to efficiently and effectively manage our locusts breeding colony output (number of feeder locusts). I will explain what I mean by visualizing it in a flow-chart and table above. Within every breeding enclosure, there is a laying bin where mature adults can lay their eggs in for seven days. On the seventh day, we switch the laying bin with a new one and put the one with the eggs in one of the hatching enclosures (8 in total). Here they will hatch, and we will raise them till they are developed into fledging-stage (winged adults). Then we use them to 1.) feed our animals as a primary food source, 2.) as a supplement for adults died in our breeding enclosures and 3.) use them as a supplementary food source and enrichment. We make the enclosure empty, clean it and make it ready to put in a new laying bin full with eggs. In this way, we rotate with our eight enclosures, and in every enclosure, we have locusts in a different stage of their development.

You can see that we have three laying bins in every enclosure in our setting. These three come from three breeding colonies (one of them on display for visitors). With this rotational system, we produce between 75-150 adult locusts every week and can provide enough locusts for many animals at our institution. Of course, depending on your needs, you can downsize or upgrade it.
What are you waiting for?
Actually, as you can see, is breeding locusts relatively easy. To start, you could buy some adult locusts at a reptile-specialized store and start breeding with them. They are typically sold as a feeder insect, but you can easily start with that. When you have the chance to see the locusts before you buy them, have a peek if they look healthy. There should not be any dead one in the container at the moment you buy them.
If you are interested in breeding your own feeder insects, you should also check out this practical guide: How to breed dubia cockroaches successfully. An excellent website that provides a lot of information about insects is Keeping Bugs. You should definitely check them out.
Do you want this practical guide as a hand-out? No problem. You can download it here for free: How To Breed (Feeder) Locusts Successfully.
If you have any question or comment about breeding locusts to use them as feeder insects, you can e-mail me at info@zoosnippets.com, or you can leave a comment below. I hope you have a flying start with breeding locusts.
Share this page!
Share this page!